In the beginning of my blogging days, I posted an entry called "Thriftiness Born of Necessity"
Basically meaning that as a poor grad student I had no choice but to be creative because I couldn't afford new things. Now, I still run into the "need" to be crafty. I now have the ability to buy most of what I want but I can never find it!
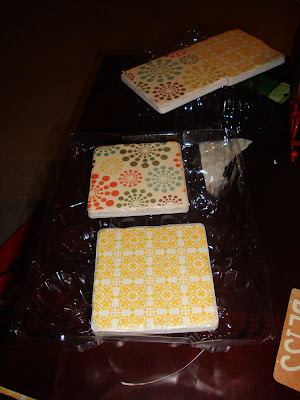
Case in point: My coasters.
I looked everywhere for cute coasters and couldn't find any. Even plain and boring ones were $20-$25. Last week I was at my friend Meg's house and checked out her painted ceramic coasters she got from a local artist. I brainstormed how to make some myself...
While on his Black Friday quest for a new tv (got it!) Sean picked up some ceramic tiles from Lowes for me.
 He got 6 for about $2. Then I picked up some scrapbook paper for $.60 cents at Michaels.
 I already had a bottle of Mod Podge.
Basically meaning that as a poor grad student I had no choice but to be creative because I couldn't afford new things. Now, I still run into the "need" to be crafty. I now have the ability to buy most of what I want but I can never find it!
Case in point: My coasters.
I looked everywhere for cute coasters and couldn't find any. Even plain and boring ones were $20-$25. Last week I was at my friend Meg's house and checked out her painted ceramic coasters she got from a local artist. I brainstormed how to make some myself...
While on his Black Friday quest for a new tv (got it!) Sean picked up some ceramic tiles from Lowes for me.
 He got 6 for about $2. Then I picked up some scrapbook paper for $.60 cents at Michaels.
 I already had a bottle of Mod Podge.
The process was So easy!
Just trace your paper to the size of the tile. Cut just slightly inside of your line so the paper is smaller than the tile.
Just trace your paper to the size of the tile.
 Cut just slightly inside of your line so the paper is smaller than the tile.
Brush Mod Podge onto the tile. Place the paper on and press it from the middle, being careful to avoid bubbles. Run the end of your brush along the edge to make the edges stick so they won't peel.

Let the tiles sit for 10-15 minutes.
 Then, brush Mod Podge over the top in an even coat, drying for 10 minutes between each coat. I gave mine 3 or 4. Then, brush on a clear coat of polyurethane to seal.
 Then, brush Mod Podge over the top in an even coat, drying for 10 minutes between each coat. I gave mine 3 or 4. Then, brush on a clear coat of polyurethane to seal.
On the bottom, I placed felt circles on each corner.
 You could cut a full square out of a piece of felt, which is cheap. Or get pieces of cork from a craftstore. Anything that will cushion the bottom to avoid scratching your furniture.
 You could cut a full square out of a piece of felt, which is cheap. Or get pieces of cork from a craftstore. Anything that will cushion the bottom to avoid scratching your furniture.
I let the polyurethane set overnight and was so excited this morning to see how they turned out.
I'm so happy with them!
One piece of paper had different license plates with "state of___" on each one. I picked my favorites and placed them on top of the patterned background.


 They were so cheap and turned out perfect. You can pick any color or pattern paper and customize them to fit your room.
We used them this morning for coffee.
 They would make an adorable christmas gift placed in a set and tied with a ribbon. The total came to about $3 for my set of 6!
Follow @ktgray13
I'm so happy with them!
One piece of paper had different license plates with "state of___" on each one. I picked my favorites and placed them on top of the patterned background.


 They were so cheap and turned out perfect. You can pick any color or pattern paper and customize them to fit your room.
We used them this morning for coffee.
 They would make an adorable christmas gift placed in a set and tied with a ribbon. The total came to about $3 for my set of 6!
XOXO,
Katie
Katie